Ottimizza le tue pagine WordPress con la Funzione di Menu
If you are looking for a way to customize the pages of your WordPress site, the WordPress Menu Feature it may be the solution for you. This feature allows you to create custom menus, allowing you to display only the pages you want to show to your site visitors. In this article, we will guide you step by step on how to leverage the WordPress Menu Feature to improve the user experience on your website.
What is the WordPress Menu Feature?
The WordPress Menu Feature gives you the ability to create personalized menus for your site visitors. In simple terms, you can select the pages to show in the menu and organize them according to your preferences. For example, if you want to create a menu that only displays your services and contact pages, you can easily do so with this feature. The menu can appear in the header, footer, or any other location on your site.
How to use the WordPress Menu Feature?
Step 1: Create a new menu
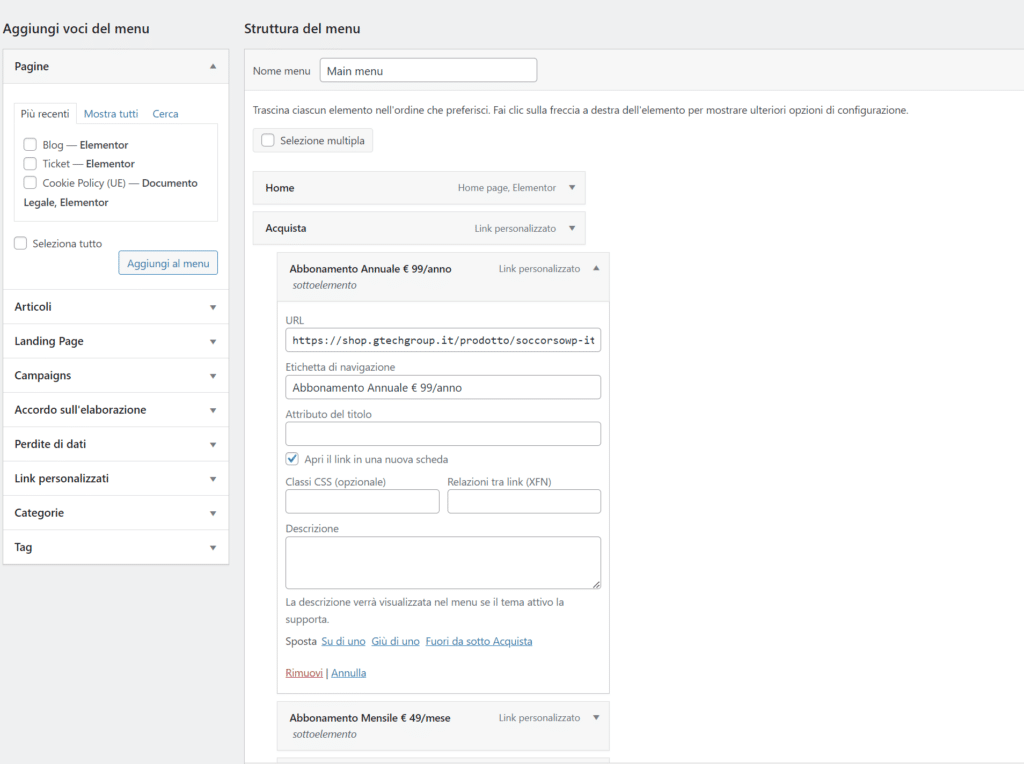
To create a new menu, navigate to “Appearance” in your dashboard and select “Menu.” On the next page, select “Create a new menu” to begin creating your first menu. After creating it, you will need to give it a name and click on the "Create menu" button.
Step 2: Add pages to your menu
Once you've created your new menu, it's time to add the pages you want to display. In the “Pages” section, select the pages you want to include in your menu. If you want to select multiple pages at once, hold down the “Ctrl” key on your keyboard. After selecting the pages, click on “Add to menu”. The pages will automatically be placed in your menu in alphabetical order, but you can rearrange them by dragging and dropping them wherever you like.
Step 3: Customize your menu
Now that you've selected the pages to display, your new WordPress menu is almost complete. You can further customize the menu as you like. To do this, use the tools on the left of the page to choose the location of the menu, organize the pages as you like, and change the navigation labels.
Step 4: Save your menu
Don't forget to save your custom menu once completed. Click the “Save Menu” button and your new WordPress menu will be ready to display on your site.
Frequently asked questions (FAQs)
- What are the benefits of using the WordPress Menu Feature?
Using the WordPress Menu Feature offers several benefits. First of all, it allows you to show only the pages you want to your visitors, improving the user experience on your site. Additionally, the custom menu can be placed anywhere on your site, improving usability and navigation.
- Can I create more than one menu on my WordPress site?
Yes, it is possible to create more than one menu on your WordPress site. This gives you more flexibility in navigating and organizing your pages.
- Can I change my menu later?
Certain. You can edit your menu at any time, adding or removing pages, rearranging existing pages, and configuring menu options.
In summary, if you want to customize your pages and improve the user experience on your site, the WordPress Menu Feature is the ideal solution. Follow the steps above to create your first custom WordPress menu and offer intuitive navigation to your visitors.
Get the most out of your WordPress site! Customize your pages with the Menu Feature. If you need assistance, contact G Tech Group for dedicated support. Open a ticket or send an email to
su*****@gt********.it
, our team will be happy to help you!


